So I can’t be bothered pulling the lift kite around every time I want to land…
Has anyone taken the next step in automating a single line lift kite with
http://ardupilot.org/planner2/
I managed simple steering by remote about 5 years ago… I want to try again with the fancy new controllers. Is this what KiteSwarms runs on?
1 Like
I oftentimes wish the day had a bit more than 24 h so I could fit in cool stuff like a RC kite. I may get around to building this at one point, because its a super useful tool for many things. My current work on the matter (which was also a Yak shave to begin with) has stalled recently unfortunately.
I can easily see the benefit for your project (@Rodread) in having a steerable pilot kite (steerable power and orientation). I think many others would be able to use it as well. Some uses:
- measuring windspeeds at many altitudes
- a pilot kite/lifter that may be taken easily down and depowered
- support for launch operations
- failsafe tether for other AWE (eg for preventing crashes to the ground of another AWE system)
Perhaps one of the lowest hanging fruits to promote AWE right now would be to create the steerable kite and make it available affordably to the community (hopefully open source kind of affordable, but even better if it may also be purchased directly in ready-to-fly condition)
3 Likes
I also need that for high altitude testing. I start to work on that. Not as easy as it seems. You need something that can reel in 25 kg continuous pull for a 4 m2 pilot. At least. You also need something irreversible otherwise you will reel out. You need a battery, a controller. As the motor has to be powerful , you need a brushless, low rpm, or a motoreductor at least. You have to do foc control with your brushless, thus you need an esc. You also want it to be lightweight. And the list is not exhaustive… All that makes it not that easy. I post a quick cad on a fb kite group to see if people would be interested for this at 300 euros. Result was mitigates…
1 Like
This post is a bit more about a desireable lifter controller … not so much experience…
The speed and accuracy of telemetry from modern autopilots is amazing.
I doubt we need an AoA control if we have a good steering control. AoA control will be good for optimising line angle to reduce cosine losses.
If you start with a well-balanced lift kite …You won’t need 25kg pull for steering line control.
In the video in the post above Can you share your experience with your lifters?
I only used one model yacht servo (servos are a bit power hungry) with a dual pulley horn on top.
One pulley wound clockwise, the other anticlockwise. When both turn together 1 reels in the other out.
Airborne, all I need is a bit of power (like kitesat / kiwee), a controller, a servo, a wee battery, bms and esc with comms. (maybe a line tension sensor but gps and altitude are basically built in)
Getting the data into the ground gen control will be the most important bit for me.
As this will let me control the rotors to reduce ground impact
If I can also instruct the lift kite what to do… Bonus.
1 Like
On a lifter kite you don’t have any control line. So If you want to reel in reel out a pilot for example, or a Cody or whatever single line kite you wil 'eed that 25kg pull at least. What you described rod is a modified lifter. Not the basic setting.
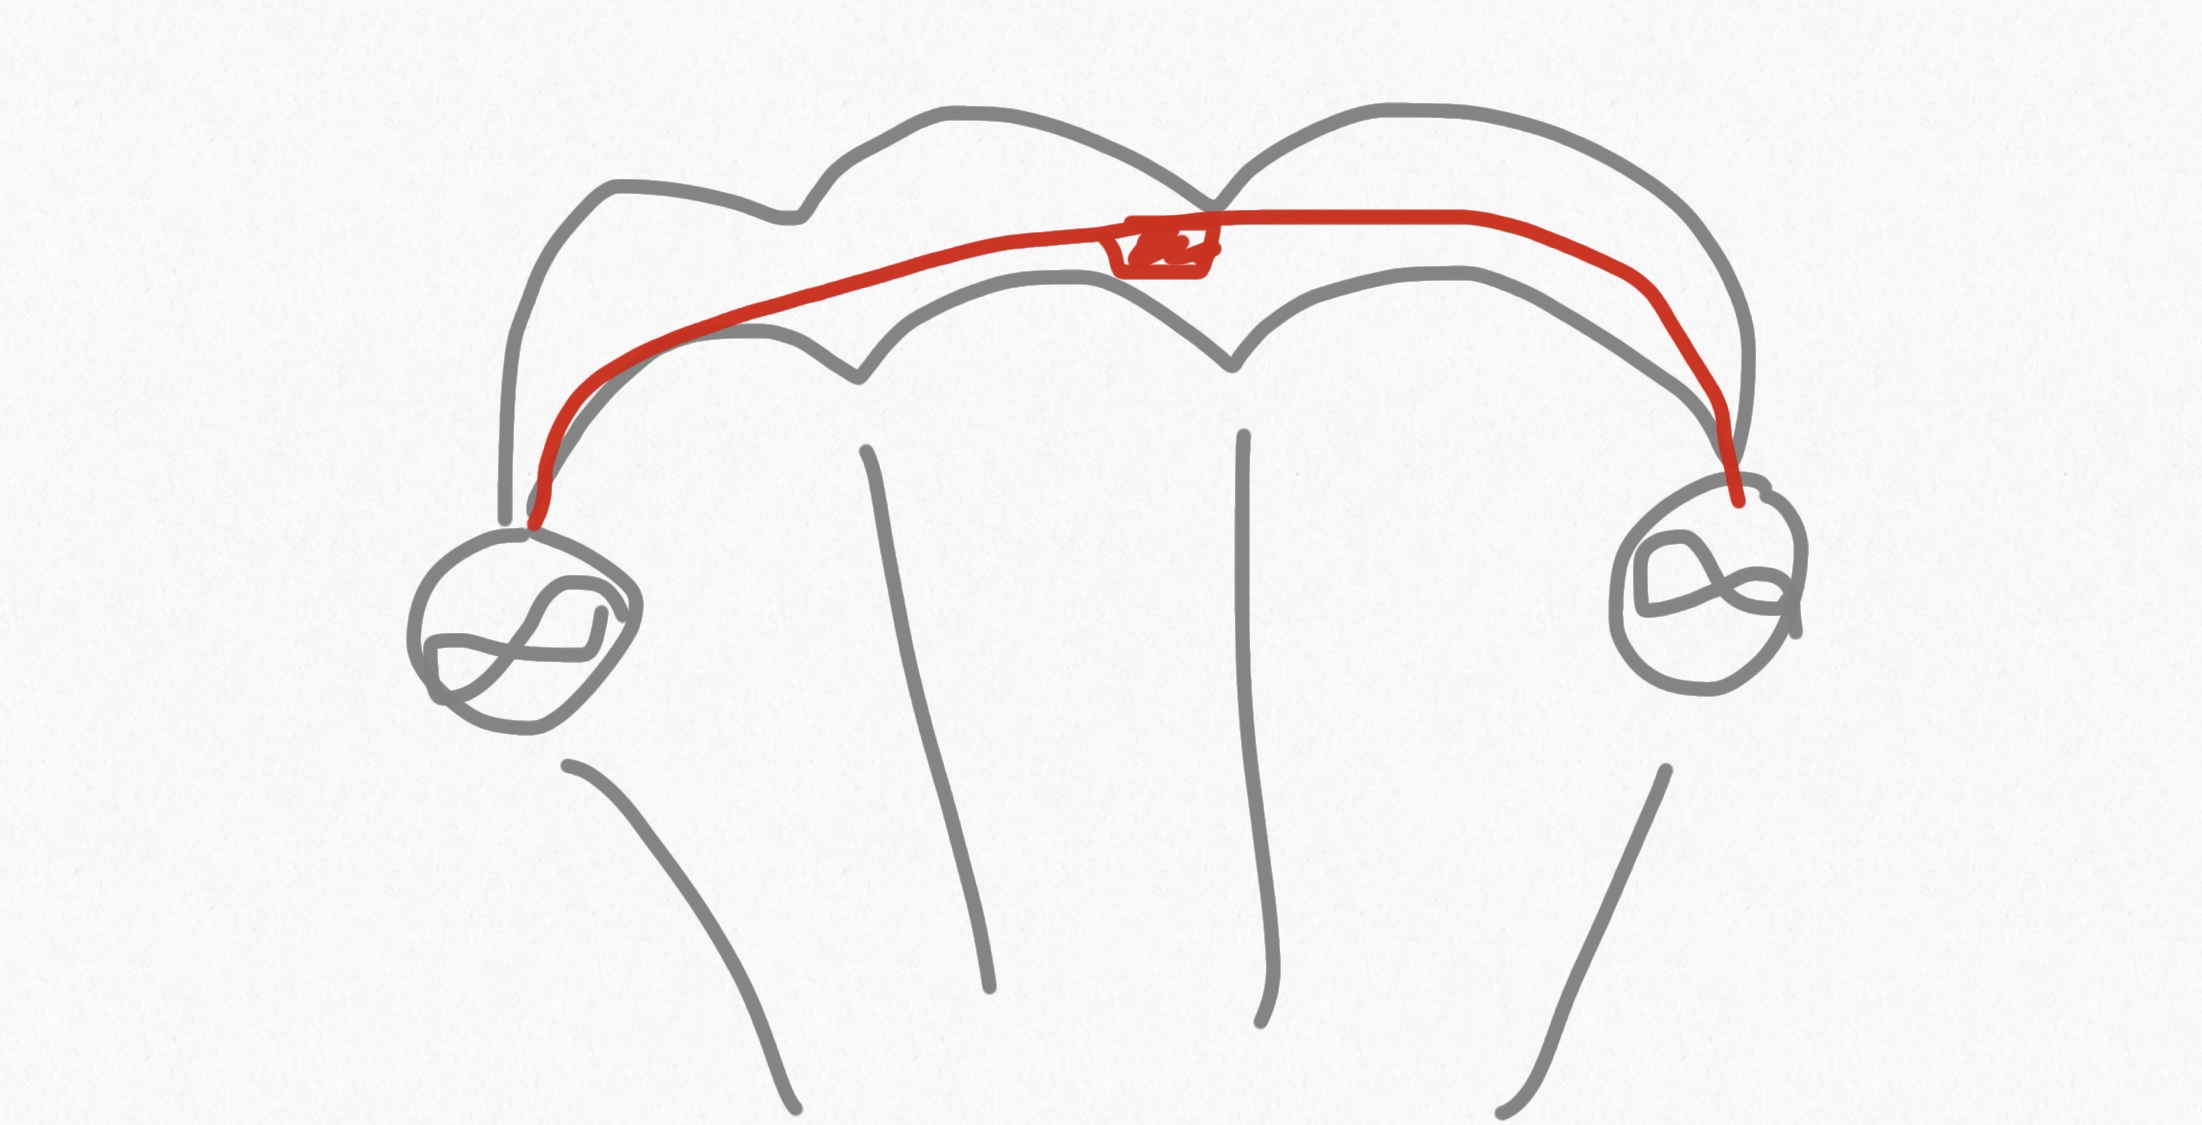
Supplying my sketch of a lightweight, batteryless, no weight below the skin, depowerable, steerable RC pilot kite.
The red stuff is a controller/wiring.
Function: when the kite starts to fly, the «windmills» at either wingtip start rotating. This powers the controller mid center (with the help of a rectifier circuit and a capacitor). The controller will first stabilize the attitude of the kite by adding a breaking force at either wingtip. It controls towards zenith with a gyro and accellerometer sensor. For depower, a breaking force is applied to either wingtip. Ideally the kite has a positive \frac{\delta C_m}{\delta \alpha} to make it stable in pitch and then hang the bridle on pulleys for a wide range of \alpha with little input.
Mayde a inflatable leading edge would benefit such a kite to make handling of the propellers easier.
In terms of actuators, you only need to set up a voltage over the terminals of the windmills dynamo to control the breaking force, along with a resistor to soak up excess energy. For most simplicity, just use a two wire brushed motor.
This would be a simpler design rather than a control pod with servos acting as winches on the lines. You are getting rid of:
- battery
- swinging weight below the kite
- power harvesting (in addition to the actuators)
- sensors for actuators position
1 Like
I could potentially tap a little power from the top of my stack of rotors, then send the power up to the lifter control.
The modification needed to add a bit of steering really doesn’t require much power.
I’m also expecting to still be able to actively reel the lifter from ground as needed.
The kite I drew could be a node in a kite network and figure out itself how and when to depower your stack locally
A kill switch could be implemented by yanking «SOS» on the tether to get rid of the radio as well.
1 Like
Or just have additional bridles. The controller unit handles some of them. The main load is transmitted over the others.
The controller could handle depowering lines on each side.
The reason i like the windmills is the simplicity of the actuator and reading back force and windspeed (adjust load by switching a resistor, while measuring only the voltage and current). I also like that the system has no battery and just works when subjected to wind. If the controller does not boot, the kite will be depowered…
2 Likes
Sounds great. I don’t get the depowering part. Not sure it will have the effect you described . I think you will maybe have some issues with starting your propeller. Also probable voltage regulation issue :like exploding capacitor for example.
1 Like
The kite is depowered when both windmills are breaking a lot. If the kite is a C kite and front/rear lines are connected via a pulley, and the kite is perfectly balanced, then adding a downwind force will cause the kite to depower/reduce \alpha. This is because the downwind force is at the wingtips at a point lower than center of gravity. Its all about tuning the moments on the kite to make it balanced, like for an airplane
2 Likes
Not sure you can control propeller drag that way. I won’t be categoric because I never measured that parameter but from my experience, it seems to me that drag is not greatly affected by the amount of power you extract from the propeller.
I wonder if some elements of this single line RC Stunt Kite (video below) could be used.
Tethering this paramotor might be interesting…
A few adaptations…
take the wheels off, bridle it by the wheel mounts…
Maybe turn it to have the fan into the wind with turbine blades for keeping charged
Add an IMU / ardupilot…
Designed for a very light load. Probably so many changes to be made, that you might as well start from scratch.
1 Like
Hi…I have recently discovered this rc paraglider and the excellent build videos made by Mr. RCAiradventures, and thought to myself “that looks so awesome, I wish I knew how to sew.” I was so blown away by the level of detail, and the attention to detail that one must pay in order to build something like this.
1 Like
I’ve attempted to revamp old simple cheap lift kite controller project.
TLDR the IMU is unreliable.
Recap: I used a model yachting servo on a remote control to effectively steer a lifter. But with poor battery life and the need for a human to steer the control I have since just used standard soft kite lifters.
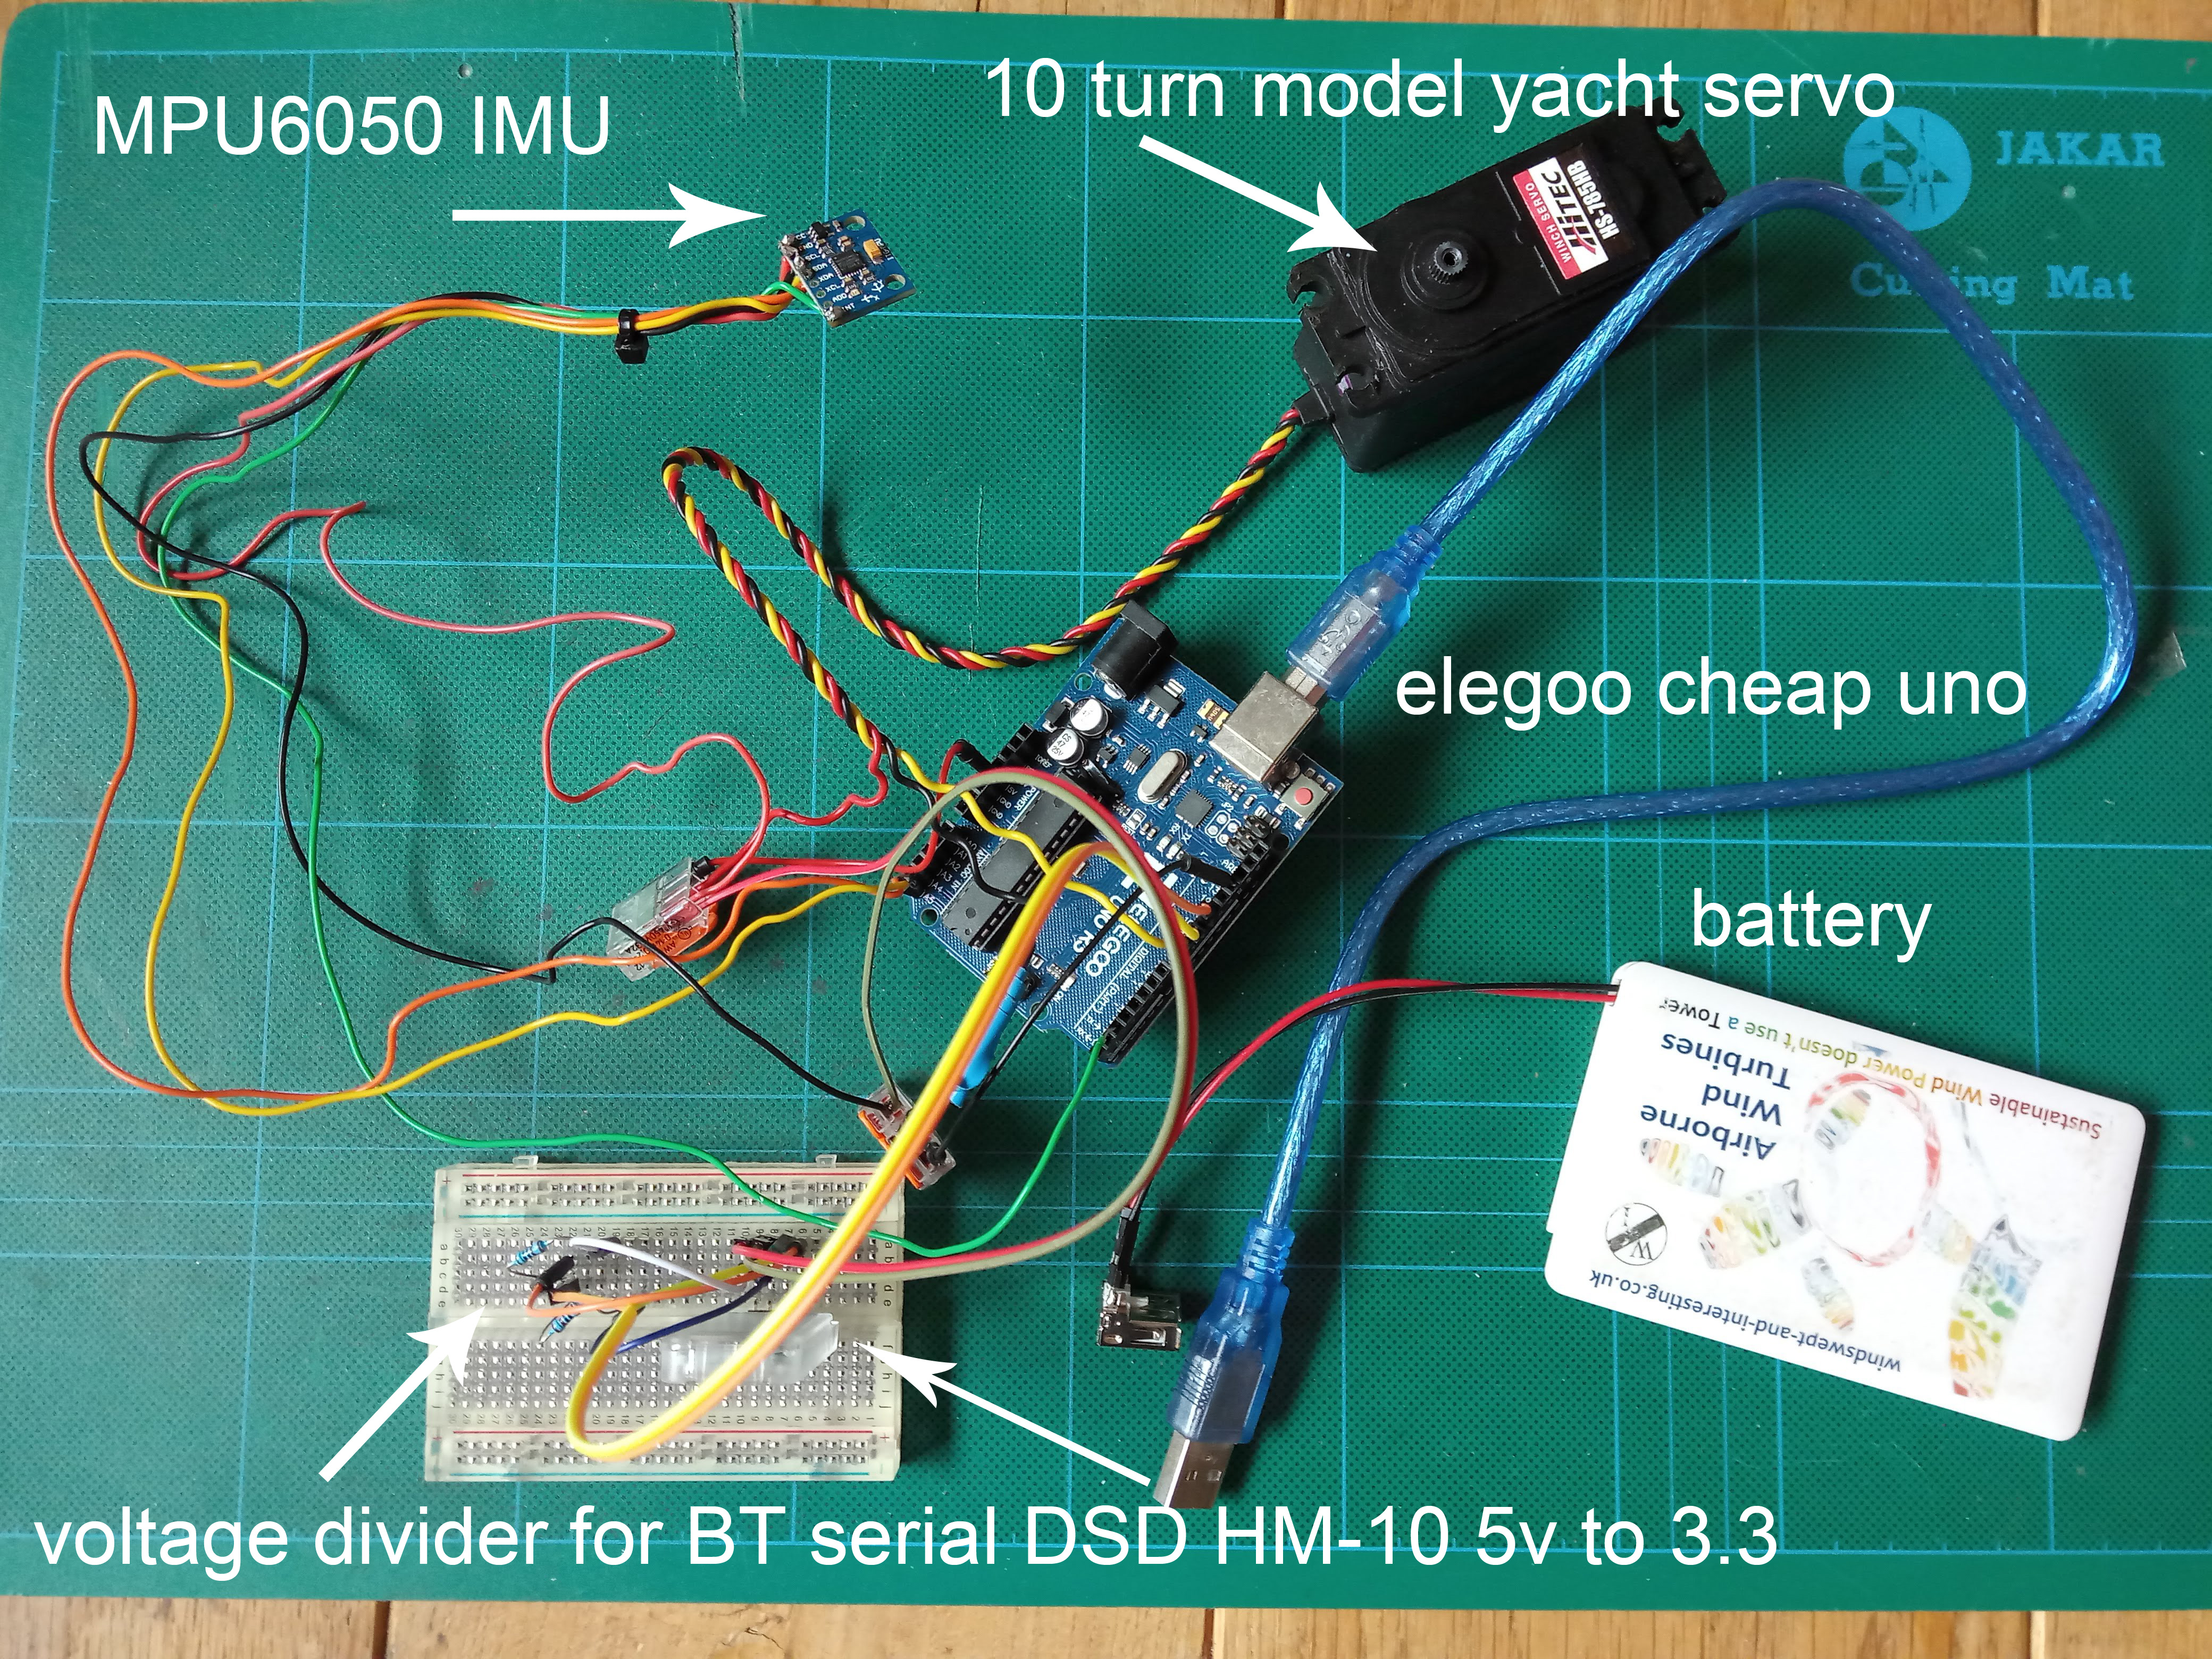
The parts I had lying around were,
Various Arduino’s (used an elegoo UNO R3)
MPU6050 IMU (a very cheap IMU)
DSD Tech HM-10 Bluetooth module (for phone to control)
HiTEC HS-785HB 10 turn high torque servo (probably too heavy on the juice for a decent battery life)
Toothed belt and matching servo head for toothed belt. (belt would be cut and ends attached to steering bridles)
Some Lego Technic (technically I stole this from the kids)
An amazing W&I LiPo battery (wooo stand back folks, form a queue.)
Smart Phone with BT serial app for ardunio comms.
Parts go together like this
and
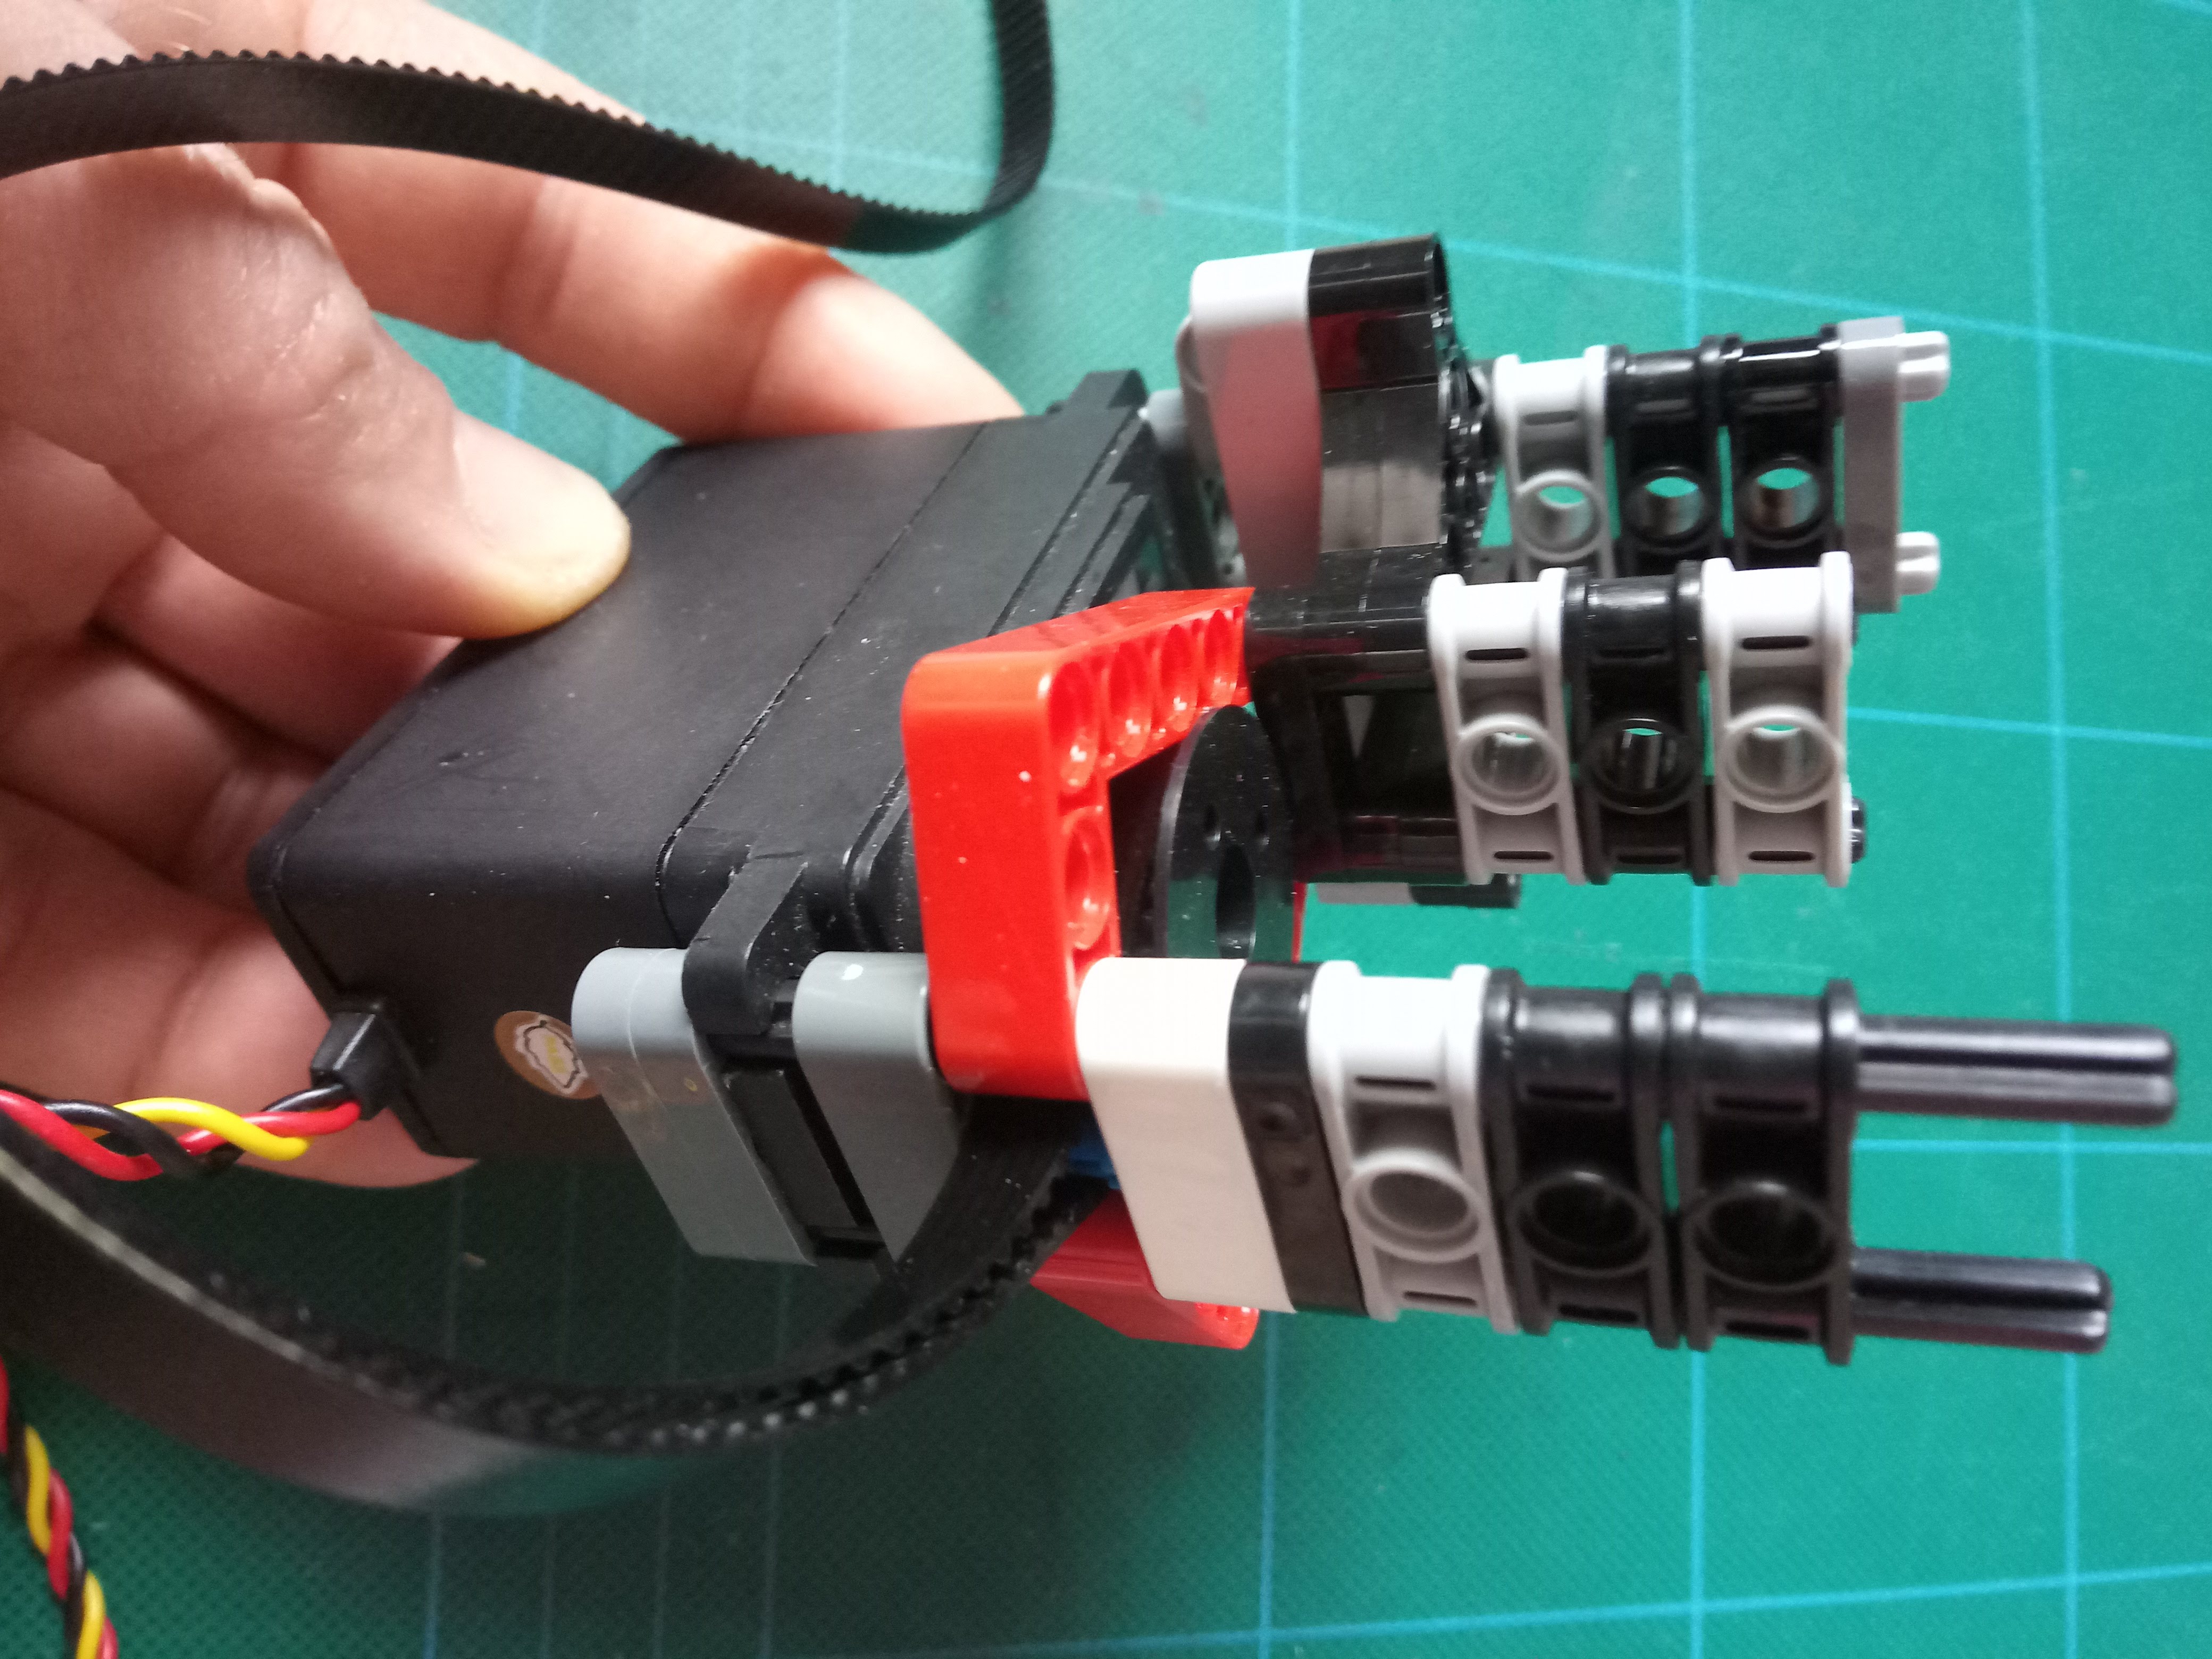
The intent was to thread the 3 main bridling lines A,B & C of an HQ KAP kite through the holes with A (leading edge) through the top hole, B mid, C lower trailing set … This way the servo would hang straightish down with the toothed belt turns freely underneath the bridle lines.
The IMU sensor was either to be tied to a rod and attached across the bridles… Or just set hung on the servo. Depending on the physical configuration you’d read a different value in the arduino code.
The MPU6050 is fiddly. It requires holding still for around 10 seconds on initialization and then even after that it drifts. Maybe I have to read up more through the spec sheet but… It’s a weak link in this project.
Also, my BT interface is rudimentary at best. You get a stream of data on your phone showing the roll angle and how far the servo is being steered… and you can send back a number 0 - 9 as an offset level for the steering to pull the kite to one side.
You know what… it kinda works… just that the drift in the IMU would be totally head doing.
Here’s the code…
//Really basic Lift Kite steering

//WARNING MPU6050 IMU READINGS DRIFT SIGNIFICANTLY
//SO MUCH DRIFT THAT THIS IS IMPRACTICAL

//Using MPU6050 IMU to get roll data for adjusting servo setting
//Any value deviating fron 0 straight up maps straight to a servo steering

//roll reading is through a running smoothing matrix

//Reading an value from phone bluetooth and applying it to further offset the kite angle
// only acceptting 1 char at a time just now until we sort out parsing number data
// each offset value is case set as an offset steering angle


//STILL NEED TO ADD A PID setpoint for where we want to sit @ e.g. val = offsetangleselected

//BTserial software from somewhere internety

//  Sketch: basicSerialWithNL_001
//
//  Uses hardware serial to talk to the host computer and software serial
//  for communication with the Bluetooth module
//  Intended for Bluetooth devices that require line end characters "\r\n"
//
//  Pins
//  Arduino 5V out TO BT VCC
//  Arduino GND to BT GND
//  Arduino D11 to BT RX through a voltage divider
//  Arduino D10 BT TX (no need voltage divider)
//
//  When a command is entered in the serial monitor on the computer
//  the Arduino will relay it to the bluetooth module and display the result.
//


#include <MPU6050_tockn.h>
#include <Wire.h>
#include <SoftwareSerial.h>
SoftwareSerial BTserial(10, 11); // RX | TX BT05 Uno connections


const long baudRate = 9600;
short c = 0;
boolean NL = true;//4


#include <Servo.h>
Servo myservo;  // create servo object to control a servo

long val;    // variable to set as roll value read from MPU6050
int offsetANGLEselected; //a variable to set as chosen offset angle
int steer;  // variable to send to the servo
int slowcount;  // dont send every reading over bluetooth only when this count is...
int slowamount;// only every 5 (as set in setup) over BT


const int numReadings = 8;  //size of array for smoothing roll readings

int readings[numReadings];      // the readings from the analog input
int readIndex = 0;              // the index of the current reading
int total = 0;                  // the running total
int average = 0;                // the average


MPU6050 mpu6050(Wire);

void setup() {
    Serial.begin(9600);
    Serial.print("Sketch:   ");   Serial.println(__FILE__);
    Serial.print("Uploaded: ");   Serial.println(__DATE__);
    Serial.println(" ");

    BTserial.begin(9600);
    BTserial.print("BTserial started at "); BTserial.println(baudRate);
    BTserial.println(" ");

    delay (1);      //because rods messed with programme timing


  for (int thisReading = 0; thisReading < numReadings; thisReading++) {
                          readings[thisReading] = 0;} //clear array
                          Serial.println("smoothing array ready");
      delay(10);

    Wire.begin();

   delay(10);

  mpu6050.begin();
  mpu6050.calcGyroOffsets(true);
  delay (10);      //because rods messed with programme timing
      // attaches the servo on pin 9 to the servo object
    myservo.attach(9);

    delay(1);       //because rods messed with programme timing

    slowcount=(0);  //count reset
    slowamount=(10);  //count limit


    BTserial.print("Sketch:   ");   BTserial.println(__FILE__);
        delay (1);
    BTserial.print("Uploaded: ");   BTserial.println(__DATE__);
        delay (1);
    BTserial.println(" ");

}

void loop() {


 if (Serial.available())
    BTserial.write(Serial.read());
     delay(10);
          // Read from the Bluetooth module and send to the Arduino Serial Monitor
          if (BTserial.available())
          {
              c = BTserial.read();
                    switch(c) {
                      //case 48: /* Number 0 */
                      case '0':
                    offsetANGLEselected = (0);
                            break;
                      //case 49: /* Number 1 */
                      case '1':
                    offsetANGLEselected = (5);
                            break;
                     case '2':
                    offsetANGLEselected = (10);
                            break;
                      case '3':
                    offsetANGLEselected = (15);
                            break;
                       case '4':
                    offsetANGLEselected = (20);
                            break;
                      case '5':
                    offsetANGLEselected = (25);
                            break;
                     case '6':
                    offsetANGLEselected = (30);
                            break;
                      case '7':
                    offsetANGLEselected = (35);
                            break;
                      case '8':
                    offsetANGLEselected = (40);
                            break;
                      case '9':
                    offsetANGLEselected = (65);
                            break;
                            default:
                              //Serial.print("Offset Angle: ");
                             //Serial.println(offsetANGLEselected);
                            BTserial.print("Offset Angle: ");
                            BTserial.print(offsetANGLEselected);

                            break;
                            }
                   delay(1);
           }


   delay(1);
  mpu6050.update();

      val = (mpu6050.getAngleZ());       //set readable roll to val
    //Serial.print(val);

        total = total - readings[readIndex];// subtract the last reading:
        readings[readIndex] = val;// read roll value from this program:
        total = total + readings[readIndex];// add the reading to the total:
        readIndex = readIndex + 1;// advance to the next position in the array:

        if (readIndex >= numReadings) { // if we're at the end of the array...wrap around to the beginning:
           readIndex = 0;             }
           delay(1);        // delay in between reads for stability

        average = total / numReadings; // calculate the average:
            delay(1);


            steer = map(average, -40, 40, 30, 150);      // set human readable kite roll limits to servo range
            delay(1);

            steer = (steer - offsetANGLEselected);
            if (steer <30) { steer = 30; }
            if (steer >150) { steer = 150; }
            myservo.write(steer);                        // sets the servo position according to roll
            delay(5);                              // wait for the servo to get there

           // Serial.print("    Steer =  ");
           // Serial.println(steer);

      slowcount++;

      if (slowcount >= slowamount){
                slowcount = (0);
               // BTserial.write(val);

                BTserial.println(average);
                BTserial.print("    Steer =  ");
                BTserial.println(steer);


                      //Serial.print(val);
                      //Serial.print("Smoothed Average Angle: ");
                      //Serial.println(average);
                      //Serial.print("    Steer =  ");
                      //Serial.println(steer);
                }

delay (20);
}
2 Likes
You can fence a code block like this:
```c++int a=1;
```
Looks like this
int a=1;
2 Likes
Thanks @tallakt
I think how my code looks is the least of my code worries…
How I structure code is often wanting. Must improve